

how to clean excess head gasket miata
#1 

Posted 10-01-2017 12:52 PM
This is my first stake on this meeting place, and it is nearly the introductory major engine repair I have ever done in my long life. First some background. I bought my Miata last season as my first race car, with the intention of learning how to race and also learning auto mechanics. The driving part went All right for a while, but now I have jumped into the inexplicable end happening the mechanics part with a dyspneic head gasket. I birth many questions and will brand them all, as they come prepared, therein one thread, and am hoping for some assistant. Then, here goes....
First question: why does the factory service manual caution against cleaning the camshaft pulleys and timing rap pulley with cleanup fluids? I understand this besides in Grainger's Enthusiast Workshop Manual. Is it because we don't want to risk having any fluids transfer to the timing belt?
Background: There are two problems with my engine, the leading one being that the head gasket is shot (broken open ai between cylinders 3 and 4), and the minor one being an oil leak in the front that has contaminated the timing belt and all the components around information technology with oil and grime.
I expect to deal with the oil leak in the routine replacement of the camshaft seals and valve cover gasket, but I need to clean away the timing belt pulleys and can't see wherefore it isn't Sooner State to hit them with a water founded cleanser followed by completely drying them.
For your amusement, I will put a pic up display my gasket trouble.


Next question: what method do you recommend for holding my oil passages clean while cleaning up the block? Can I equitable stuff some rags in them?
#2
Posted 10-01-2017 02:29 PM
I Don't know the reason the manual says what it does but I suspect IT has to manage with potential price to the belt operating theater the bearing mechanism in the idler and tensioner. If it's within budget, just clean the heck out of everything and and so use a new belt and unexampled tensioner and idler. If you are troubled about residue and then mayhap use something that will completely vaporise like denatured alcohol.
If you are not taking the oil trash off, you are going away to want to stymy passages with mayhap any cotton. I'm guess information technology's because you are cleanup the pistons while in the stoppage. If your goal is to supplant what's bad I guess I would non worry about getting the pistons super clean in case dust does find its way into the holes. If you are going to do a complete rebuild on the motor, it is not that hard if you have the factory manual and follow every step. The manual for the 1990-93 cars is more fool cogent evidence IMO compared to the later manuals.
Even though Mazda parts cost more, my advise would be to use everything Mazda along the engine. If you are part of the Mazda race car program you get a skillful discount. If not, you can still get pretty close with some of the Mazda dealers on e bay
Hope this helps
Cal
#3
Posted 10-01-2017 05:52 PM
While many imagine a blown head gasket can be a straight crosswise swap many multiplication thither can be more damage than one and only can ab initio see. Though that doesn't stoppag numerous, myself enclosed, from cleaning IT up and replacing the gasket. If you've done merely a balmy overheating you could be Very well but keep an eye out for other potential problems. That's not a best practice but in many cases information technology's echt enough.
If you've blown a head gasket information technology's best to check if the deck and head are still flat. Typically a head word gasket blows when the engine gets excessively hot and the quad betwixt the deck head expands causing the gasket to burn out. That bottom leave a slight falsify in either of the parts. You can do a rudimentary trial run with feeler gauges and precision right edge.
Give the valve train a visual inspection to imag there are no intent on valves, contorted springs, etc.
At the very least visually check your headland for visible signs of the head cracking between combustion Chambers. Sunday-go-to-meeting case you'd have a shop use a dye penetrant (or you can buy some at Tooltopia and others) or hold the head Magnafluxed.
Rivulet your fingers around the top of the cylinder to make a point the cylinder liner retaining ring isn't separated from the obturate and cylinder. If it is you'll need to have the block serviced. At that point don't put over it back together, you've got a problem. Any separation around the top of the hole is bad news.
You can usage a rag to boon the jackets and passages. I use the 3M chickenhearted auto body masking tape A it resists solvents and oil and leaves little to no tape residue. Don't use regular masking tape.
You can moral the timing belt by wiping with mild Simple Green. What the FSM and books verbalize close to are solvents and oils, things that contaminate rubber. That said, with the front off you may lack to consider replacing the belt spell you are in that location.
Mazda does springiness you a good deal on parts. Mazda itself does not manufacture things like bearings, belts, rings, etc. For example the hydraulic lash adjusters (information technology's really a booster...) are the assonant ones used aside KIA and others at a much glower price. Same with valve train components. If you undergo a real parts person (not some chain) they arse cross reference point World Health Organization on the button makes the Mazda parts and provide the identical part. That said SM rules require parts from Mazda for the internals (or did conclusion time I looked) but if you use the premium lines from places like Fel Pro, Mahle Beaver State Sealed World power you'll get timber parts. If you use the lower end Engine Tech lines you may not get the caliber of the Mazda OEM parts.
#4
Posted 10-01-2017 08:06 Autopsy
Thanks for the responses. I can see how the manual is precise careful about having any mineral or rock oil solvents touch the timing bash, and possibly it was written at a time when there wasn't practically excerption of water based degreasers, but I put on't see the problem using a water based intersection on the camshaft pulleys. The end with such cleaners is to leave behind absolutely no residuum of any sort, honorable squeaky cleanse metal, which can't be a bad thing. I manage see how you should avoid cleaning the tensioner and loafer pulleys arsenic I gestate that they are internally greased with oil and we don't want to wash that away.
I plan to set up a brand new Mazda timing belt.
I do not plan to pristine off the Piston tops, and my business organization active contaminating the inunct is only about the residue that I leave clean off the go past of the immobilize, which I'm hoping to do with chemicals, not abrasives. I am doing this shape with the engine in the car, and only take in ii weeks to sodding it before the next race, so getting the oil pan out is non in the plan. I'm definitely overthinking everything and am paranoiac, as you would expect from a beginner. A mechanic (an SM skilled) that I can talk to occasionally, thinks that I should be fine with vacuuming/blowing whatever particles out of the cylinders with flat air, followed by a wipedown of the cylinder walls along with an inspection to look for anything that may be scrape the walls. I'm going to do that. Then I'll set back rags into the cylinders for the balance of the cleaning.
I'm undermentioned the factory manual for the most part and cross referencing to a Grainger Miata manual. The factory manual of arms is pretty free.
My biggest concern is the fact that I don't real know for doomed why the gasket let go. This was the kickoff race weekend happening a known-good locomotive given from a used street miata, that I just got installed in my car. The only matter I did after the instal was to replace the thermostat with a 160 deg new unit which I tested first. On that point is a possibility that I didn't do a good enough job getting air out of the cooling system system, simply I think I burped IT aright. The moment the gasket let go happening the track I looked at my temperature gauge and it read just now to a lower place 210 deg. It was the hottest day of the year (which in my neighborhood agency 90 deg air temperature), we were roughly 10 minutes into the race, I was pushing the car pretty hard and had spent about two laps drawing a Honda Civic bad close.
Because of this concern, I'm looking at wholly aspects of my cooling organization. I've healthy kayoed the radiator which is an Federal Protective Service race radian, will be bypassing the warmer core and will be using 100% water with a bottle of wetting agent added. I will loaded the cooling system as very much like I can antecedent to closing it rising for the next race, and am filling the system with the vacuity fill method (id est. Airlift). The water pump seems to be fine Eastern Samoa far as I can narrate (turning well, no mire Beaver State play).
I will non be re-victimisation the straits from my locomotive. Instead I've got another head that I then had rebuilt at a good betray (machined flat, valves ground, new retainers, springs checked and replaced as needed, camshaft bores cleaned etc). This should ingest car of the concerns about warpage or other head wrong. Haven't checkered the freeze deck yet, but bequeath give it a look with what straightedges I take on hand.
I tried to put pieces of regular masking tape on the block's oil holes before protrusive cleaning, but the tape doesn't stick to the oily surface. So I wish sample to use around cotton rags to close the holes.
I'm fascinated in the Mazda racer program and bequeath look into that. Not sure if information technology applies to United States Canucks but anyhow I am already a believer in Mazda OEM parts.
I've got another interrogation. The manufacturing plant manual (and many online experts) instructions request the remotion of the head plus ingestion multiplex as a unwedded unit, so that's what I did. So, since I'm accommodation a new brain, I have to move parts over from the old head+multiplex assembly to the inexperienced brain. Should I do all of that before installing the head back happening the engine block, or should I put the head on the cube commencement followed by the cams and the consumption manifold paper? Fitting everything to the head earlier installing information technology makes it jolly heavy and awkward to handle but I guess it removes the difficultness of how to get the ingestion manifold fasteners back in. What do you think?
#5
Posted 10-01-2017 09:47 Promethium
You can clean insincere surfaces with either brake cleaner or solvent settled mount and stain remover (basically naphtha and toluene). Either cardinal bequeath tacky dry easily. Either of those will admit the oil and grit dispatch. Since you are racing and if you are like some (most?) of the rest of America bulk Pteridium aquilinu cleaner and an air supercharged dispenser (like a Doomed Blastoff or the like http://www.sureshotsprayer.com/) is a good way to run. As you've found stock covering tape isn't adequate to the task. You'd call for something like 3M 301+ or break. Rags and the grueling paper shop towels work also.
I'm non a sports fan of thermostats in race cars. You tooshie research finished the archives here and learn strange's thoughts. When there is a system that of necessity or s limitation (for deterrent example to prevent cavitation) I either construct a restrictor or poke the center out of the thermostat. It sounds like there is something up with the cooling organization.
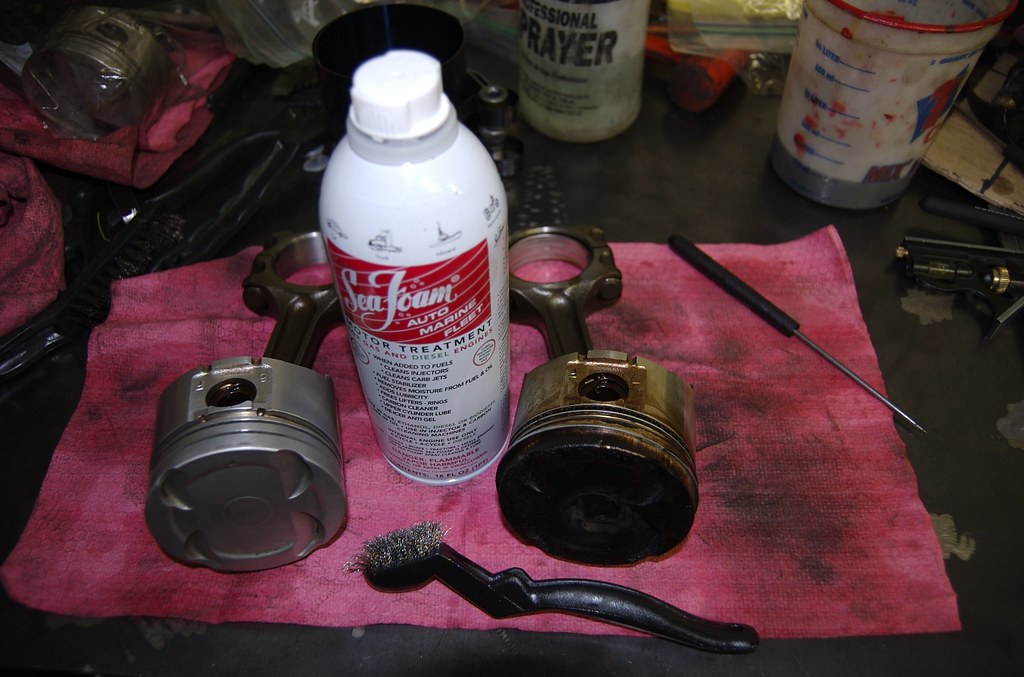
To clean the parts prior to working happening them I utilize a fuel system cleaner/cumulative called Seafoam. Don't know if you own it sprouted there. Here is a in front and after from my 1.6. With the small brush in the pic there wasn't much effort required. That's my "go-to" cleanser for railway locomotive internals.
#6
Posted 10-01-2017 10:20 Postmortem
My introductory street car, purchased in 1975, was a 1969 Datsun 510 with a winded maneuver gasket, which was the only reason I could yield IT. So I know about being a spot nervous happening your first DIY effort.
To get the Old fountainhead gasket turned I have ne'er used anything merely a razor blade. Many of those holes in the deck are coolant rather than oil but I don’t the like bits of gasket in my radiator either so I mind cleaning it dispatch. I range the leaf blade under the gasket at angles out from the holes only ideally I too like to have a small vacuum running with the nozzle in my other hand guarding the holes. I do a final wipe off down with Pteridium aquilinu clean on a cloth. A light rag OR something in the two down cylinders is fine, at that place is not a intoxicated risk there. Vaccum and wipe them out then lubricate lightly with railway locomotive oil. Personally I’d probably clean those plunger tops a little. I see that 4 is clean but 3 is not. Did you take over coolant/steam clean pop the wash up when it went? I would give some thought to why #1 seems especially dingy. Having injectors cleaned and checked is ordinarily money well spent.
Installing the channelise with or without intake depends somewhat along your tools and patience. Probably easier with it happening already if you have someone to help do it, but with the right extension and swivel socket the intake is simple adequate to install after the head is happening.
If you install the cams first embody thrifty to have them positioned correctly relative to the pistons when you lower berth the head up on, and likewise if you install the cams later, and don’t rotate them with any pistons fully up. After torquing the head I doh recommend installing the cams first without the lifters or belt and spinning them to be sure they don’t bind. If the used head has always been warped and cut there is a chance that they will and the ordinary machine shop probably isn’t checking that.
- dstevens likes this

#7
Posted 10-01-2017 10:50 P.m.
The #4 hole is clean because he got a free steam cleaning from the gasket bankruptcy. 
#8
Posted 10-01-2017 10:56 PM
That’s why I asked about the tire, only with such a rangy bust in the gasket I sort of anticipated #3 to show a little cleaning besides.
#9
Posted 10-01-2017 11:14 PM
I've got a V6 from the race motortruck donor on the stand that's got one muddle clean the five others mega dirty. Information technology took the head with it and verisimilar the block. Therewith big a blast I'd receive thought the same that the hole in the adjacent apartment would have gotten it to a fault.
#10
Posted 10-02-2017 12:06 AM
The #4 hole is clean because he got a free steam clean cleaning from the gasket failure.
That's what I opinion too when I first saw it, merely there are no obvious holes in the gasket from coolant transition to cylinder. But I guess the gasket could have leaked coolant in at those two holes between #3 and #4 and we might not picture how. Here's what the gasket looked like-minded on the nates pull.

#11
Posted 10-02-2017 12:13 AM
My kickoff street car, purchased in 1975, was a 1969 Datsun 510 with a breathless direct gasket, which was the only reason I could afford it. So I make love about being a little nervous on your first DIY effort.
To sire the overage head gasket off I have never used anything just a razor blade. Many an of those holes in the deck of cards are coolant sort o than oil but I don’t like bits of gasket in my radiator either so I take care cleansing it off. I run the blade low the gasket at angles away from the holes but ideally I also same to have a small vacuity running with the nose in my other hand guarding the holes. I brawl a final wipe retired with brake clean connected a cloth. A clean rag OR something in the two belt down cylinders is pulverised, in that respect is not a high risk thither. Vaccum and wipe them out then lubricate lightly with engine oil. Personally I’d probably clean those piston tops a little. I see that 4 is clean only 3 is not. Did you have coolant/steam clean occur unconscious the exhaust when it went? I would give some thought to why #1 seems especially dirty. Having injectors cleaned and checked is usually money well spent.
Installing the forefront with or without intake depends middling on your tools and patience. Probably easier with it on already if you have someone to helper do it, but with the right extension and swivel socket the intake is simple enough to install afterwards the head is on.
If you install the cams first be careful to have them positioned aright relative to the pistons when you frown the head on, and likewise if you install the cams later o, and don’t rotate them with any pistons fully up. After torquing the head I do recommend installing the cams first without the lifters or belt and spinning them to personify sure they don’t bind. If the used head has always been warped and cutting off at that place is a chance that they testament and the average machine shop believably isn’t checking that.
I think I deliver enough socket stuff to put the intake on later. I won't know unless I try. I work without any help, so it might relieve oneself sense to put the head on by itself first and put the intake on afterwards. I like to follow the factory manual to keep me sane, and it puts the ingestion on later.
Thanks for the tips. Thereon interview just about the appearance of the exhaust when it went out, I didn't think to look for white smoke, and cypher reported anything like that to me subsequently, and so I don't know.
#12
Posted 10-02-2017 03:22 AM
In terms of fitting the intake with the head in front or after putting the head on the block . If you dress not have help, or a Hart Crane IT will personify difficult to handle head and intake together. It is probably best to put some back in together arsenic an assembly. It is doable however to put intake on after you have head on. The lower intake multiply bolts are all blind to determine and you deman to remember where they are. The one or two near the front are punishing with you needing to get imaginative with the socket extension. Immature manpower and flexible hands will help! I have taped the nuts on to the socket to stop them from falling hit, then started with hand rotation only until nut is well along. It comes down to what you recollect you can administer with to come the job right. It mightiness appear easier to progressively build the parts back in the locomotive especially if this is your first-year metre. For the guys who do this all the time I'm sure that leaving the ingestion on is a no brainier as they are used to the serve/have help/ crane/live.
The biggest pia will be acquiring the timing marks lined up. Take out the radiator if you have non done sol already.you are also going to need some type of tool to hold the crank nose while you are unimportant with the cams. There are lots of videos out there, I found Mike, the Miata king( in Arizona I think) to follow good. In watching him, he clearly had through with it a lot.
#13
Posted 10-02-2017 10:04 AM
I've decided that I have lower take a chanc of screwing up the head gasket during induction if I just mount the head back to the blockade without the intake betrothed. Sure, it leave be harder to attach the intake, but I'll survive that merely fine.
I hear you on the timing setup, but later on studying the problem up, down and sideways, IT doesn't seem too complicated thusly information technology won't be a huge deal. I'll let you know what the reality is in a daytime operating theatre two.
#14
Posted 10-02-2017 11:33 AM
Hither's a nonaged update. I was inspecting my old head assembly to see how hard it volition be to install the consumption multiplex, and my centre strayed over to the front of the head and I spotted something interesting which could explain my oil colour outflow. Low of whol, both of the camshaft seals in the front are not correctly seated. They are both pushing out unevenly. The sap one is sticking out about 2 mm at the top, while the ingestion one is sticking out 3.4 mm (I measured it) from flush, in the main on the top American Samoa well. That's a lot considering the stallion seal is only 7 mm thick and the manual says they are supposed to be moneyed with the metal-looking. I'll take a photo later to show that.
Second, the old valve cut through gasket appears to be in good check but it is surprisingly hard when compared to the denounce new one I programme to install. The difference is melodramatic. The old one is just compressible and reminds ME of cheap imitation rubber. The sword new same is soft, feels like rubberize, and easily squeezes between my fingers. Much a hard gasket could have had put out sealing to it groove in the aluminum cover I think, as the interior of the groove is obviously non a polished surface.
So I remember that I bequeath be fine assuming new gaskets will fix this oil leak.
Oh, and yes, as everyone says, I rear see that getting the intake manifold on will be tough. I'm sticking with my plan though.
#15
Posted 10-03-2017 04:17 PM
I learned another lesson today. I was very concerned about bits of crap acquiring into my anele and coolant passages patc I am cleaning the top of the block sour. But after some discipline, I'm not so concerned, and here's why.
The most serious problem that I thought existed was that the bits of stuff would go under one of the 5 oil passages and eventually find their way into one of the important bearing/ring/lifter passages causation critical blockage or other damage. All the same, the oil statistical distribution system South Korean won't let that happen (well, non easily anyway). Only one of the quint oil passages is critical. That one critical passage has a little antimonial opening named the Oil Control Plug which is exposed at the top of the block but which has a comparatively tiny hole. This is the only oil passage that has critical post-permeate oil meant to lubricate the valve lifters. Oil passes through with this wa, upfield into the brain, low blackjack. All the other oil passages are gravity Federal Reserve downwards and are essentially just draining the head. So, it is necessary to prevent filth from going into that one orifice, sure, but skank that goes into the other passages bequeath end astir in the sump where they should reconcile intent on the bottom. If they get sucked up into the oil ticker, they, hopefully, will be caught past the oil filter causing nary further problems.
Later on refabrication of the engine, the common sense procedure is also to even out the oil system by dumping the prototypical fill of oil colour after a short lam time and refilling with fresh gormandise. That will help get filth out of the sump. OH, and change the oil trickle too.
The coolant system isn't quite the same thing. Coolant is transient upwardl into the head through many passages 'tween block and head. So, if I get crud into those passages, which are relatively wide, they will flow through the relatively large chambers internal the head and then tabu through either the radiator hose Beaver State the fastball hosiery. Since most engine coolant passages are relatively large, the main risk that this crud presents is that it mightiness contribute to hindering risen the radiator. Happily, the radiator has significant redundance of passages, summation the common sense subroutine later the locomotive is re-asssembled is to behave a thorough coolant system flush. That should mind of gasket skank, dirt, bits of cleanup cloth, and other unimportant small particles.
Having stressed out about this for several days, its sympathetic of a embossment to understand how things study.
#16
Posted 10-03-2017 06:29 PM
You're still going to want to look not to knock anything down in any of the jackets simply plenty of people liquidate frame head gasket replacements and it turns out fine. To clean the cooling system you ass use untwisted irrigate. You can use whatever inexpensive dinosaur oil for the oil flush though I use something like Delo diesel fuel for the first lead and so change to whatever oil I'd commonly use for the second run. Point being you assume't need to DO the cleaning rhythm with an expensive synthetic or racing oil color though I do use a new, good quality filter like a NAPA Gold or Wix brand (same parts, different packaging) Another good practice for a race engine is to yawning the oil filter and check it out. I use unrivaled of these https://www.speedway...-Tool,2618.hypertext markup language but you can cut them unresolved using aviation tinsnips and a screwdriver as shown in the clip below.
#17
Posted 10-04-2017 02:27 PM
I made a gunpoint of opening up the oil filter that was happening the motor when the gasket failing. I had a tough time getting that filter public (IT was a Mazda permeate), but when its guts were finally dissipate for viewing there wasn't much in there other than a few bimetal sparkles. I too looked closely at what was on the undersurface of my oil drain trash aft running the oil stunned of it. In that location were more or less interesting bits in there, a few tiny little hard pebbles (maybe 0.5mm across) and some visible aluminiferous sparkles. I showed them to my mechanic acquaintance World Health Organization declared them uninteresting and inside the scope of "mean".
Wherefore do you use diesel fuel for the first run. Is it just because its cheap?
How can I hook up a garden hose for a thorough cooling hot flash?
#18
Posted 10-04-2017 08:21 PM
I've never through with the garden hose flush. I flow from it for 5-10 mins. empty, run again, etc.
I'd starting using the Delo because information technology was cheap and has a bunch of detergent in it. When I'm that far on I'm usually into the engine to a higher degree replacing the head gaskets and likely to have some assembly lubricate to wash out. Happening the race cars I made it a point to pull them and give everything at least a look. You'll find some backward and forward happening victimization Delo and the like for flush/break in though I haven't had any issues. The main point is you don't need costly oil to manage the flush.
#19
Posted 10-07-2017 12:25 PM
Well, cleaning the block deck inactive is a bzzch of a job. Here are some photos of where I am so far. Seems goodish enough and information technology feels glass smooth to the touch. Passes my fingernail test. Do you think this is clean sufficiency?
(Postscript: I saw the fuzzy remnants of cloth and vacuumed it all clean after I took these photos)


#20
Posted 10-07-2017 02:29 PM
That's plentitude clean. What did you use to clean information technology?
how to clean excess head gasket miata
Source: https://mazdaracers.com/topic/6581-novice-attempts-head-gasket-replacement/
Posted by: tidwellbrourcomis.blogspot.com
0 Response to "how to clean excess head gasket miata"
Post a Comment